Level Your Camper With Easy To Use Equipment
You'll need to level your camper once you get it maneuvered into that parking space.
To do this, you will need to keep a good level in your easy access door to help you. With some levels you can mount directly on your camper.
If you choose to not drill holes or have one mounted on your camper wall, you can get a portable one that you can sit on the tongue of the hitch and watch as you do your leveling.
In addition to the level, you will need a couple more things to level your camper.
To Level Your Camper,
First You Need the Wheel Chocks
The first thing you need to do after you get parked is a good set of sturdy wheel chocks.
The kind you lay on the ground behind the tires is good enough to keep your camper from rolling.
Be sure to put one behind the rear tire on one side and one in front of the rear tire of the other side.
This will keep it from moving from one side to the other.
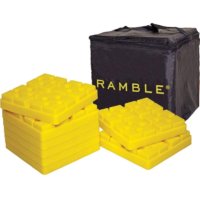
Just stack the interlocking blocks together to the desired height and drive your RV onto the levelers. High-density, molded polypropylene construction withstands the weight of even large RVs.
These blocks are bright yellow for high visibility and easier positioning after dark. The eight block set includes nylon storage bag.
Your camper will not roll and ratcheting tire chocks are more secure than the ones you put in front of and behind your tires when you first begin to level your camper.
When you apply opposing force to tandem tires you get much more added stabilization. These retract to 1 3/8" and extends to 12". It includes plated ratchet wrench with comfort grip.
You can lock them for added security. You will need 2 sets. One for each side of your camper.

You really can't do much of anything else until you level your camper.
The front level will guide you as to whether your camper is needs leveling from front to back.
You will adjust the height with the rotating handle or your electric wheel adjust.
Lock in the Level
After you get your front to back leveled, you can let down the leveling feet that are made on most campers just underneath each corner.
If your camper has them, let them down one corner at a time with the wrench that came with your camper. You can also use a rechargeable drill with a socket for fast and easy leveling. My husband had a great idea with this one! Tighten each one alternating from corner to corner.
Keep a check on your level on the camper to be sure you are not getting any adjustments off on your side to side or front to back levels.
If your camper does not come with the level jacks already built in, you will have tandem jacks to put under each corner. There are specific spots to put your jacks, so make sure you are on them. You don't want to push a hole through the floor or any other part of your camper.
Once you level your camper, you can start getting everything else ready. It sounds like a long, lengthy process, but it is not really.
Once you get used to how the leveling process works, it gets easier and easier. You will find it one of the "just comes naturally" feeling once you do it a few times.
Most camping pads are generally level, but some you will need to work on.
Concrete pads are much easier to work with as the foundation will not give any.
With gravel pads, you have rocks that may shift, especially if it rains.
You may find it beneficial to practice leveling your camper in your own driveway just to get used to the procedure.
You will find it will save you lots of time when you get to your camping area, leaving more time for fun.
Return from Level Your Camper to Prepare For Camping